Garmin GPSMAP 496 Manuel d'utilisateur
Naviguer en ligne ou télécharger Manuel d'utilisateur pour Navigateurs Garmin GPSMAP 496. Garmin GPSMAP 496 User's Manual Manuel d'utilisatio
- Page / 196
- Table des matières
- MARQUE LIVRES
- Owner’s Manual 1
- INTRODUCTION 3
- Table of Contents 4
- INTRODUCTION > WARNING 7
- INTRODUCTION > CAUTION 8
- GETTING STARTED 9
- Charging the GPSMAP 496 10
- Turning On the GPSMAP 496 11
- Getting Satellite Signals 12
- Receiver Status 13
- GPS Tab Options 14
- GPS Tips 14
- Learning About the Keypad 15
- Using the GPSMAP 496 16
- 2. Press ENTER 17
- GPSMAP 496 Databases 18
- MapSource Detailed Maps 18
- Starting Simulator Mode 19
- GPSMAP 496 Owner’s Manual 11 19
- Entering a New Location 20
- AVIATION 21
- AVIATION MODE PAGES 37
- Map Orientation 38
- Selecting Map Ranges 38
- Setting the Bug Indicator 42
- Setting Up the Map Page 42
- Setting Up the Panel Page 49
- Manually Setting a Course 49
- VNAV (Vertical Navigation) 50
- Turning on the XM Audio Page 59
- XM Audio Page Options 60
- Using Favorites 61
- Scanning XM Radio Channels 62
- Turning Audio On or Off 62
- AUTOMOTIVE 63
- Marine Mode Page Sequence 99
- Navigating in Marine Mode 100
- Map Page 101
- Compass Page 102
- Using the Marine Timer 103
- DSC Page 104
- Understanding Distress Calls 105
- Receiving DSC Calls 105
- DSC Call List 106
- DSC Directory 107
- Setting up DSC 108
- DSC Setup 108
- GPS Page 109
- MAIN MENU > GPS TAB 109
- Audio Sub Tab 110
- XM Tab Audio Sub Tab 110
- Flights Tab 111
- Route Tab 111
- User Sub Tab 112
- Proximity Sub Tab 112
- Active Sub Tab 112
- Saved Sub Tab 112
- Sonar Tab 113
- Aircraft Tab 113
- Alarms Tab 114
- System Alarms Sub Tab 115
- Weather Alarms Sub Tab 116
- Celestial Tab 117
- Tide Sub Tab 118
- AIN MENU > CELESTIAL TAB 119
- Hunt & Fish Sub Tab 120
- Message Tab 121
- Display Tab 122
- Sound Tab 123
- System Sub Tab 124
- VNAV Sub Tab 124
- Road Routing Sub Tab 125
- Guidance Sub Tab 126
- Timers Sub Tab 127
- Units Sub Tab 128
- Location Format Sub Tab 128
- Map Datum Sub Tab 128
- Welcome Sub Tab 129
- Interface Sub Tab 130
- MAIN MENU > SETUP TAB 131
- AIN MENU > SETUP TAB 132
- Advanced NMEA Output Setup 133
- USING XM WX WEATHER 134
- Setting XM WX Weather Options 135
- Weather Explorer Tab 136
- Avtn Wx Tab 136
- Srfc Wx Tab 137
- Mrn Wx Tab 137
- Using the Weather Tab 138
- Weather Options 139
- Information Sub Tab 140
- Finding Weather Information 141
- Marine Weather Bulletins 142
- Marine Weather Bulletin 142
- SETTING UP AND USING SONAR 143
- Using the Sonar Page 144
- Adjusting the Sonar Page 145
- Resizing the Split Screen 147
- Setting Up the Sonar Page 148
- Calibrating the Water Speed 149
- Setting Up the Sonar Display 150
- 20' 151
- 10' 151
- Transducer Coverage 152
- Whiteline 153
- Thermoclines 153
- Reset the Temperature Graph 154
- 3,500 ft 155
- 3,000 ft 155
- TIS Limitations 156
- TIS > TIS LIMITATIONS 157
- TIS Symbology 158
- Traffic Ground Track 159
- Traffic Warning Window 159
- Intruder Aircraft 161
- + 500 ft 161
- This area within 34 seconds 161
- - 500 ft 161
- VHF COMM 162
- Physical Specifications 163
- Performance 163
- Accuracy 163
- Cleaning the Unit 164
- Storing the GPSMAP 496 164
- Immersing the Unit in Water 164
- Optional Accessories 165
- Installation Information 166
- GXM 30A Antenna Plugged In 167
- Interfacing 170
- Removing the GPS Antenna 170
- Common GPS Terms 171
- Differential Field 171
- What is WAAS/EGNOS? 172
- LORAN TD Feature 173
- Using the LORAN TD Format 173
- APPENDIX > LORAN TD SETUP 174
- What are Map Datums? 175
- What is a Location Format? 175
- Database Updates 178
- Messages 179
- APPENDIX > MESSAGES 180
- Data Field Options 182
- Software License Agreement 184
- Contact Garmin 184
- Limited Warranty 185
- AOPA Airport Directory Notice 186
- Weather Data Warranty 186
- FCC Compliance 188
Résumé du contenu
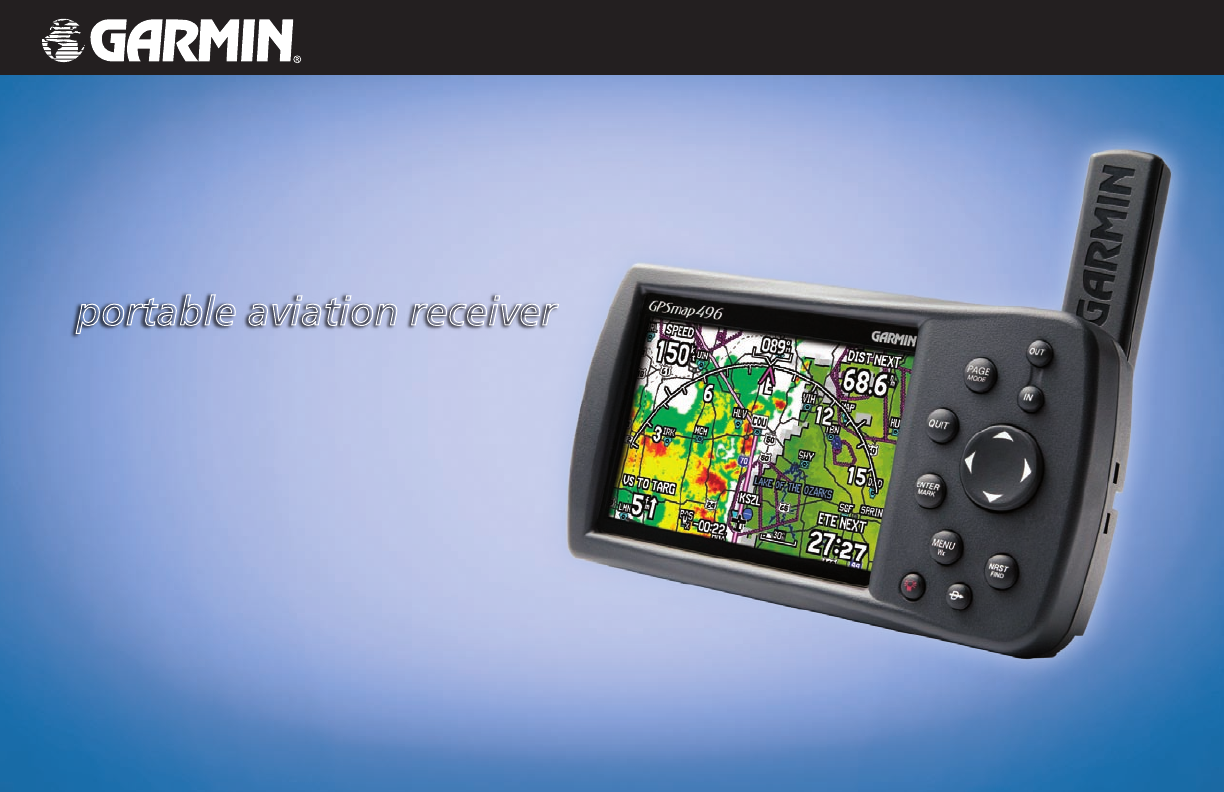
Owner’s Manualportable aviation receiverGPSMAP® 496
Charging the GPSMAP 496Before using the unit, you need to charge the battery in the GPSMAP 496. Plug the unit into a 12 Volt connector to charge. You
MARINENavigating in Marine ModePress Direct To on any page to begin navigating to a destination. The Go To Point, Navigate Route, and Navigate Track
MARINEMARINE MODE PAGES AND FEATURESMarine Mode operates in a similar fashion to Aviation Mode, while also providing many features and operations of A
MARINECompass PageDuring active navigation, the Compass Page guides you to your destination with data fields and a graphic compass screen with a bearin
MARINEUsing the Marine TimerThe Marine Timer, specifically designed for sail boat racing, allows you to easily count up or down specified time increment
MARINEDSCThe DSC Page allows you to control and set up the Digital Selective Calling (DSC) features on the GPSMAP 496. DSC uses marine VHF radio and G
MARINEUnderstanding Distress CallsWhen the GPSMAP 496 receives a distress call from a connected DSC enabled VHF radio, an alert message and notificatio
MARINEDSC Call ListThe DSC Call List shows the 50 most recent calls, even if the unit is left unattended. The Call List shows the most recent call fro
MARINEDSC DirectoryThe DSC Directory acts much like a phone book and can hold up to 50 entries. Pressing MENU from this page allows you to add a New
MARINENavigating to a Position Report or Distress CallAfter a Position Report or a Distress Call is received, navigation can be quickly set to the cal
MAIN MENUThe Main Menu features some additional pages that are useful to you as you plan trips and use your GPSMAP 496. Some of these pages have alrea
Turning On the GPSMAP 496The first time you turn on your new GPSMAP 496, the receiver must collect satellite data and establish its present location. T
Weather TabUse the Weather tab to view individual weather features without turning all other weather features on or off. For example, you can select S
Information Sub TabUse the Information sub tab to view the radio identification number, XM WX Satellite Weather subscription information, and a list of
Points TabThe Points tab contains two sub tabs, User and Proximity, which allow you to manage a large number of waypoints quickly and efficiently. For
Sonar TabThe Sonar tab contains options for the Sonar Page. See the “Setting Up the Sonar Page” section beginning on page 140 for more information abo
Alarms TabThe Alarms tab allows you to define alarm settings. To access the Alarms tab on the Main Menu:1. Press MENU twice to open the Main Menu. 2.
Navigation (Nav) Alarms Sub TabNext Turn—sets an alarm to indicate next turn in route. Select Off for no Next Turn alarm. Select Dist to enter a speci
Weather Alarms Sub Tab You must be receiving XM WX weather information for the weather alarms to work.Weather Alarms Sub TabTornado Warnings—sets an a
Celestial TabThe Celestial tab on the Main Menu shows sun and moon information, data for the tide, and hunting and fishing information. You can show th
To view Sun & Moon information for a different location:1. Use the ROCKER to highlight the From field and, press ENTER.2. Highlight Use Find Men
To view a tide chart for a different tide station:1. From the Tide tab, highlight the At field, and press ENTER. The Find Menu opens showing the tide
Getting Satellite SignalsAfter you turn on the GPSMAP 496, the unit automatically begins searching for satellites. The GPS Page appears while the unit
Hunt & Fish Sub TabThe Hunt & Fish sub tab provides you with predictions of the good and best times to hunt and fish in a selected location on
Message TabThe Message tab shows a list of messages generated by your GPSMAP 496. Use the ROCKER to scroll through the list of messages on the Log tab
Display TabThe Display tab allows you to set several features of the screen, such as what pages to show in the main page sequence and how long the bac
Sound TabThe Sound tab allows you to customize the sounds your GPSMAP 496 makes to suit your needs. To view the Sound tab:1. Press MENU twice to open
Setup TabTo customize how your GPSMAP 496 operates, adjust certain system settings in the Main Menu. System Sub TabTo open the System tab, press MENU
Road Routing Sub TabUse the Road Routing sub tab to select road routing settings.To access the Road Routing sub tab1. Press MENU twice to open the Ma
Calculate Routes for—sets route calculation for the particular vehicle you are operating to optimize the route for your vehicle type, some roads have
Timers Sub TabTo open the Timers sub tab, press MENU twice, select Setup from the vertical tab list, and Timers from the row of tabs along the top. Ti
Units Sub TabThe Units sub tab allows you to customize measurement units for the entire system. To open the Units sub tab, press MENU twice to open th
Selecting a Different Heading ReferenceYou can select from Auto Mag Var, True, Grid, and User Mag Var. Auto Mag Var provides magnetic north heading re
GPS PageReceiver status fieldSky viewSignal strength barsPower source indicatorThe progress of satellite acquisition is shown in three stages:• No sig
Interface Sub TabThe Interface sub tab controls the input/output format used when connecting your unit to external devices. To open the Interface sub
• RTCM In—allows Differential GPS (DGPS) input using a standard RTCM format.• RTCM In/NMEA Out—allows Differential GPS (DGPS) input using a standard
The Status field shows one of the following:• Tuning—the unit is attempting to tune to the specified frequency and bit rate.• Scanning—the unit is aut
Advanced NMEA Output SetupIf you are going to interface the GPSMAP 496 with another piece of equipment (such as a radar or autopilot), the unit needs
USING XM WX WEATHERThis section describes how to use XM WX Weather with your GPSMAP 496. If you do not have a subscription to XM WX Weather, the featu
Setting XM WX Weather OptionsUse the options menu on the Map Page to adjust the way weather items appear on the Map Page. Four tabs—Weather, Avtn Wx,
Weather Explorer TabUse the Weather Explorer tab on the Map Setup tab on the Map Page to turn XM WX Weather data on or off, and to set the zoom range
Srfc Wx TabUse the Srfc Wx tab to set the zoom range at which surface weather information first appears on the Map Page.Srfc Wx TabSurface Winds, Surfa
Using the Weather TabUse the Weather tab to view individual weather items without turning all other weather features on or off. For example, you can s
3. Highlight the forecast you want to view—Current, 12 Hour, 24 Hour, 36 Hour, or 48 Hour, and press ENTER. The Map window on the Weather Explorer ta
GPS Tab OptionsPress MENU two times to open the Main Menu. Use the ROCKER to highlight GPS. Press MENU to open the options menu:GPS Tab Options MenuS
Viewing Additional XM WX Weather InformationThe XM Tab contains the Information sub tab. Use the Information sub tab to view the radio ID, service lev
Finding Weather InformationYou can use the Find menu to access weather information for your current location or from another location on the map. By s
5. Highlight the Bulletin tab to view marine weather bulletins.Marine Weather BulletinsYou can highlight a weather bulletin and press ENTER to view t
SETTING UP AND USING SONARThis section covers the additional sonar options for the GPSMAP 496 when used in conjunction with a GSD 20 or GSD 21 Sounder
Using the Sonar PageWhen combined with a GSD 20 or GSD 21 Sounder Module, your GPSMAP 496 becomes a powerful fishfinder/flasher with the Sonar Page. If a
Adjusting the Sonar PageThe Adjustment Menu allows direct access to the settings and features most commonly used on the Sonar Page. There are ten main
Zoom—used to quickly select a zoom scale or to split the screen. When a scale other than No Zoom is selected, the Adjustment Menu shows a new selectio
Depth Line—adds a horizontal depth line across the screen that is used to measure the depth of underwater objects. The depth of the line appears in a
Setting Up the Sonar PageUse the Sonar tab in the Main Menu to set up the Sonar Page. Press MENU two times to open the Main Menu. Select Sonar from th
Calibrating the Water SpeedIf you select Temp, Spd is for the Transducer option on the Sonar Setup tab, you also need to calibrate the water speed to
Learning About the KeypadIN/OUT Keys• Press to zoom in or out on the Map Page.ROCKER Keypad• Press up, down, right or left to move through lists,
Setting Up the Sonar DisplayYou can set up how the sonar information is shown on the screen. Press MENU two times to open the Main Menu. Select Sonar
Understanding SonarThe transducer mounted on your vessel transmits sound waves toward the bottom of a lake, stream, or seabed in a cone-shaped pattern
Transducer CoverageThe area covered by the transmitted sound waves is determined by the cone angle of the transducer and the water depth. The wide con
WhitelineThe GSD 20 or GSD 21 Sounder Module can help you determine whether the bottom is hard or soft. When the sonar sound waves are reflected back b
Viewing the Sonar Temperature Tab NOTE: You must be receiving proper sonar data from another device, such as a Garmin GSD 20 or GSD 21 Sounder Module
TIS (TRAFFIC INFORMATION SERVICE)TIS provides a graphic representation of traffic advisory information in the cockpit for non-TCAS equipped aircraft.
TIS LimitationsTIS is NOT intended to be used as a collision avoidance system and does not relieve the pilot responsibility to “see and avoid” other a
TIS information is collected one radar scan prior to the scan during which the uplink occurs. Therefore, the surveillance information is approximately
The GPSMAP 496 supports TIS input from a Garmin Mode S transponder, such as the GTX 330. To configure TIS input:1. Press MENU twice. The Main Menu app
If the number of Traffic Advisories on the TIS display decreases and then increases, a new audio alert is sounded. The TIS audio alert is also generate
Using the GPSMAP 496This section explains how to enter and select information with the GPSMAP 496. To switch between Aviation, Marine, and Automotive
Map PageTIS traffic can be shown on the Map Page.To configure TIS Traffic on the Map Page:1. Press PAGE until the Map Page appears.2. Press MENU. The M
TIS Operational ProceduresTIS warns the user with voice and visual traffic advisories whenever it predicts an intruder to be a threat. The user should
VHF COMMThe GPSMAP 496 can also output frequency data to a Garmin aviation radio. Currently the two models supported are the SL30 nav/comm and the SL4
APPENDIXSpecificationsPhysical SpecificationsSize: 5.7'' W x 3.2'' H x 1.9'' D (14.5 x 8.1 x 4.8 cm)Weight: 14.2 oz (
Care Information To resolve problems that cannot be remedied using this guide, contact Garmin Product Support in the U.S.A. at 800/800.1020 or Garmin
Optional AccessoriesIn addition to the standard accessories included with your GPSMAP 496, the optional accessories are designed to enhance the opera
Installation InformationThis section of the Appendix provides information on connecting the GPSMAP 496 to auxiliary devices and removing the antenna.C
Connecting the GXM 30A AntennaConnect the GXM 30A antenna to the GPSMAP 496 to access XM WX satellite weather and XM Radio. For more information about
Connecting Your GPSMAP 496 to a ComputerYour GPSMAP 496 can be connected to your computer using the included USB-PC Interface Cable to connect to a US
Using xImage for Customized Waypoint SymbolsxImage allows you to exchange images between your PC and your GPSMAP 496. You can download and save screen
Selecting Options and Entering DataTo enter data and select options, you must use the ROCKER to highlight, select, or choose an item in a list or a fie
InterfacingThe following formats are supported for connection of external devices: GARMIN proprietary Differential GPS (DGPS), NMEA 0180, 0182, 0183 (
Learning About GPSThe Global Positioning System (GPS) is a satellite-based navigation system made up of a network of 24 satellites placed into orbit b
• Check Beacon Wiring—the DGPS setting is enabled in the Interface sub tab on the Main Menu but no DGPS device is detected.• No Beacon Signal—DGPS r
LORAN TD SetupLORAN C is a radio navigation aid operated and maintained in the United States by the United States Coast Guard. The name LORAN is an ac
To set up LORAN TD from the Main Menu:1. Press MENU twice to show the Main Menu. 2. Use the ROCKER to highlight Setup on the vertical tab list. Then
Map Datums and Location FormatsMap Datums are based on a mathematical model of the Earth.What are Map Datums?A datum is a mathematical model of the Ea
Digital Selective Calling (DSC)Digital Selective Calling (DSC) uses marine VHF radio and Global Positioning System (GPS) technologies to transmit and
How Are MMSI Assignments Obtained?Non-commercial users, such as recreational users, who remain in United States waters and only carry VHF, EPIRB (Emer
Jeppesen Database InformationThe GPSMAP 496 includes an internal Jeppesen® database that provides location and facility information for thousands of a
MessagesAccuracy Alarm—the GPS accuracy has fallen outside of user-set value.Alarm Clock—the alarm clock has sounded.Antenna Shorted to Ground—the ext
To enter data in a data field:1. Use the ROCKER to highlight the data field you want, and press ENTER to activate the field.2. Press up or down on the
Memory Full—unit memory is full, no further data can be saved.Memory (RAM) Failed Unit Needs Repair—there is an internal problem with your unit. Conta
Steep Turn—approaching a turn that requires a bank angle in excess of 25 degrees to stay on course.Sunrise, Switching to Day Mode—the unit is switchin
Data Field OptionsThe following list provides a brief description of each data field option. Some of these options are supported only by devices interf
Sunset—the time at which the sun sets on this day.Time—the current time and date. It can be shown in 12-hour or 24-hour format in local time or univer
License Agreement and WarrantyThis section of the Appendix contains information about your license agreement and warranty for the GPSMAP 496.Software
Limited WarrantyThis Garmin product is warranted to be free from defects in materials or workmanship for one year from the date of purchase. Within th
AOPA Airport Directory NoticeAOPA MEMBERSHIP PUBLICATIONS, INC. AND ITS RELATED ORGANIZATIONS (HEREINAFTER COLLECTIVELY “AOPA”) EXPRESSLY DISCLAIM ALL
LIMITS ON OUR RESPONSIBILITYa) DISCLAIMERS. EXCEPT AS EXPRESSLY PROVIDED HEREIN, WE MAKE NO WARRANTY OR REPRESENTATION, EITHER EXPRESS OR IMPLIED, REG
XM Satellite Radio Service AgreementXM Satellite Radio Inc.Hardware and required monthly subscription sold separately. Subscription fee is consumer on
INDEXSymbols2D 5, 63, 1433D 5, 63Aaccessories 157acquiring satellites 5Active Route pageaviation mode 44Active Track tab 87, 90add to route 61,
Simulator ModeThe GPSMAP 496 contains a Simulator Mode. Simulator Mode is helpful for practicing with the unit indoors or when no satellite or XM sign
Ddashboard 73data card 161slot 1data fields 35date 119daylight saving time 119DB-9 160declutter 33defaults 8, 35deleteaircraft profile 48categ
JJeppesen database 27, 170updates 10Kkeypad 7Lland at closest point 19language 116legs, track 90limited warranty 177lithium-ion 1, 2local time
position report 168–169power 2, 3, 158connector 1, 4practice mode. See simulator modepreferenceslocation 167pressure 120projecting a waypoint 81
timedelay 165format 119offsets 167tab 119zone 119timer 95Timers tab 119TIS 147, 152limitations 148operational procedures 153symbology 150tr
For the latest free software updates (excluding map data) throughout the life of your Garmin products, visit the Garmin Web site at www.garmin.com.©
© 2006 Garmin Ltd. or its subsidiariesGarmin International, Inc. 1200 East 151st Street, Olathe, Kansas 66062, U.S.A. Tel. 913/397.8200 or 800/800.1
Entering a New LocationFrom the GPS options menu you can enter a New Location and New Altitude to simulate from. To enter a New Location using the ma
AVIATIONBASIC OPERATION IN AVIATION MODEAviation Mode Page SequenceThe GPSMAP 496 offers three usage modes, Aviation Mode (default), Automotive Mode,
AVIATIONCreating a Direct ToIn Aviation Mode, press Direct To to select a destination. When a Go To or route is currently in use, holding Direct To
AVIATIONTo go to a recently-used or user-created waypoint:1. Press Direct To to show the Go To Page. Use the ROCKER to select the Recent or User ta
AVIATIONAirport Tab of Details Page3. Highlight Show Map, and press ENTER to view the item on the map. Press QUIT when done. Highlight OK, and press
AVIATIONViewing AOPA Airport Directory InformationThe AOPA Airport Directory contains airport statistics such as pattern altitudes, noise abatement in
AVIATIONFinding a Nearby PointIn Aviation Mode, press NRST/FIND to open the Nearest Pages. These pages provide detailed information on the nearest air
AVIATIONSelecting a Nearby Point as Your DestinationIn an emergency, you can press a few keys to have the GPSMAP 496 guide you to the closest point to
AVIATIONViewing Communication FrequenciesThe Nearest Pages list up to five nearest flight service station (FSS) and air route traffic control center (ART
AVIATIONViewing Additional Airspace InformationFrom the Nearest Pages, you can show additional airspace information, such as floor and ceiling limits o
INTRODUCTIONThank you for choosing the Garmin GPSMAP® 496, an unsurpassed portable aviation receiver that utilizes the proven performance of Garmin GP
AVIATIONSetting Airport CriteriaFrom the Nearest Airport tab, an options window allows you to filter out airports that do not meet a defined criteria. T
AVIATIONSelecting an Approach CAUTION: The approaches provided in the Jeppesen database are for monitoring purposes only. The GPSMAP 496 is not an IF
AVIATIONUnderstanding VectorsThe Vectors? option, which appears after you select an approach, determines how you navigate to the final approach waypoin
AVIATIONFinding Points on LandTo take full advantage of the trip-planning capabilities of the GPSMAP 496, you can find points on the land and then crea
AVIATIONMarking a WaypointWaypoints are locations or landmarks you record and store in your GPSMAP 496. Press the ENTER/MARK to capture your present l
AVIATIONCreating a Flight Plan (Route)You can create a Flight Plan (or route) using the Route Page in the Main Menu. The Route is then saved for futur
AVIATIONFollowing your Flight PlanWhen you have created and started your flight plan (or route), the GPSMAP 496 guides you to the destination using a v
AVIATIONAVIATION MODE PAGESThis section discusses the major pages, such as the Map and Terrain Pages, as well as some additional aviation features, su
AVIATIONMap OrientationThere are three map orientation options: North Up orients the map like a paper map, Track Up orients the map in the direction o
AVIATIONPanning the MapThe panning arrow allows you to pan the map to show other map areas. As you pan past the edge of the current map, the screen
Table of ContentsIntroduction ...iAbout This Manual ...
AVIATION4. Select an on-screen button, and press ENTER. 5. Press QUIT to exit the Information Page.Airport Information PageSmart AirspaceSmart Airsp
AVIATIONClearing Unwanted Details from the MapYou can remove items from the map (declutter the screen) to remove unwanted items, such as highways. Avi
AVIATIONSetting the Bug IndicatorYou can set a bug indicator to show bearing or course to steer. You can also enter a specific heading reference for th
AVIATIONChanging the Page Layout and Data FieldsTo customize the pages to show what you want, adjust the page layout and data fields. You can adjust ho
AVIATIONAdditional Map DataYou can view the data that is currently loaded on your GPSMAP 496 unit and data card.To review or change data card informat
AVIATIONTerrain PageThe Terrain Page, available only in Aviation Mode, provides an overhead view of the terrain and obstacles beneath you. Alert windo
AVIATIONAlertsIf you are on another page of the GPSMAP 496 unit, Terrain, Obstacle, and Descent Rate Alerts show in the lower-left corner to inform yo
AVIATIONSetting Up the Terrain Page and AlertsUse the Terrain Setup Page to set levels for terrain alerts as well as obstacles in or near your flight p
AVIATIONPanel PageThe Panel Page shows GPS-derived data in a graphical format, similar to an instrument panel. Keep in mind the differences between th
AVIATIONSetting Up the Panel PageYou can set the bug indicator and change the CDI scale to suit your needs.To set a user-defined bug heading reference:
Automotive Mode Pages and Features ...69Map Page ...
AVIATIONVNAV (Vertical Navigation)The VNAV sub tab in the Main Menu provides settings for the vertical navigation feature. These settings create a thr
AVIATIONPanel Page Showing the VNAV IndicatorVNAV IndicatorVNAV indicators also appear on the Map Page when the page layout is set to Map With Overlay
AVIATIONActive Route PageWhenever you start a route (flight plan) or initiate a Go To while in Aviation or Marine Mode, the Active Route Page shows eac
AVIATIONPosition Data PageThe Position Data Page provides a quick reference for the important data you want to show while navigating a route in Aviati
AVIATIONFlight LogThe Flights tab shows a list of any recorded flights, including date, route of flight, and flight time. The GPSMAP 496 saves up to 50 r
AVIATIONAircraft InformationThe Aircraft tab is divided into two sub tabs: Aircraft Profile and Weight & Balance. To open the Aircraft tab:1. Pres
AVIATIONTo rename or delete a saved aircraft profile:1. From the Aircraft Profile tab, use the ROCKER to highlight the Current Aircraft and to select
AVIATIONE6B TabThe E6B tab in the Main Menu calculates Density Altitude, True Airspeed, and Winds Aloft (Head Wind, Tail Wind, Wind From, and Wind Spe
AVIATIONTo calculate true airspeed and density altitude:1. From the E6B tab, highlight the Indicated Altitude field (at the top of the page), and pre
AVIATIONXM Audio PageUse the XM Audio Page to view and select XM Radio channels, add channels to or remove channels from the Favorites category, and
Using XM WX Weather ...126Viewing XM WX Weather ...
AVIATIONXM Audio Page Field on the Display TabTo select an XM Radio channel: Press up or down on the ROCKER to scroll through the list of channels, h
AVIATIONUsing FavoritesYou can create a customized list of up to 30 of your XM Radio favorites.To add a channel to Favorites:1. Use the ROCKER to sel
AVIATIONScanning XM Radio ChannelsFrom the XM Audio Page, you can scan all channels, scan channels in a specific category, or scan channels in your Fav
AUTOMOTIVEBASIC OPERATION IN AUTOMOTIVE MODETo switch usage modes:1. Press and hold PAGE/MODE. 2. Use the ROCKER to select either Aviation, Automoti
AUTOMOTIVENavigating in Automotive ModeAutomotive Mode and Marine Mode are similar. Most of the features discussed here also apply to Marine Mode. The
AUTOMOTIVETo start new route using the Find Menu:1. Press Direct To to open the Navigate menu.2. Highlight New Route (or Go To Point when in Marin
AUTOMOTIVEFinding an ItemThe Find Menu allows you to easily search the stored waypoints and points of interest. Press NRST/FIND to access the Find Men
AUTOMOTIVETo find an item from another location:1. From any page, press NRST/FIND. 2. Using the ROCKER, highlight the category you want from the list
AUTOMOTIVEViewing the Information PageEach item on the map and each item listed in the Find Menu results list has an information page.To view details
AUTOMOTIVECreating RoutesThe GPSMAP 496 lets you create and store up to 50 reversible routes, with up to 300 waypoints each. Routes can be created in
Failure to avoid the following potentially hazardous situations could result in an accident or collision resulting in death or serious injury.When ins
AUTOMOTIVETo create a route graphically:1. Press MENU twice to show the Main Menu. Use the ROCKER to highlight Route from the vertical list of tabs.
AUTOMOTIVECreating WaypointsWaypoints are locations or landmarks you record and store in your GPSMAP 496. Save your current location as a waypoint by
AUTOMOTIVECreating Waypoints From the MapYou can create a waypoint using the Map Page. When you pan the map and move the arrow over a map item, a high
AUTOMOTIVECreating a Waypoint by Entering CoordinatesYou can manually enter location coordinates to create a waypoint. This method is useful for creat
AUTOMOTIVEFollowing an Automotive RouteThe GPSMAP 496 guides you to your destination using many tools, such as the Map Page and Current Route Page.Tra
AUTOMOTIVEEditing Your RouteWhen you are navigating a route, you can edit that route. You can add areas and roads to avoid as well as temporary detour
AUTOMOTIVECreating a DetourIf, while navigating a route, there is road construction or a closed road, you can have your GPSMAP 496 create a detour rou
AUTOMOTIVEAUTOMOTIVE MODE PAGES AND FEATURESThis section discusses the major pages in Automotive Mode, such as the Map Page, as well as some additiona
AUTOMOTIVEHighway PageThe Highway Page is only available in Marine Mode and Automotive Mode. In Automotive Mode, the Highway Page is not shown by defa
AUTOMOTIVEHighway Page OptionsThe Highway Page options menu allows you to define the data fields and select which waypoints and track are shown on the s
Failure to avoid the following potentially hazardous situations may result in injury or property damage.The GPSMAP 496 is designed to provide you with
AUTOMOTIVECurrent Route PageWhenever you have started a route in the GPSMAP 496 in Automotive Mode, the Current Route Page shows each turn of the acti
AUTOMOTIVETrip ComputerThe Trip Computer Page provides a quick reference for the important data you want to show while navigating a route in Automotiv
AUTOMOTIVEEditing and Managing RoutesThe Route tab shows the routes you have created in your GPSMAP 496 unit. For complete information on routes, refe
AUTOMOTIVENavigating a Saved RouteThe Navigate Route option allows you to easily select a saved route. For information about creating routes, refer to
AUTOMOTIVETo review individual route points:1. Press MENU twice, and highlight Route.2. Use the ROCKER to highlight the name of the route, and press
AUTOMOTIVETo edit the route on the map:1. Press MENU twice to open the Main Menu. Use the ROCKER to select Route from the vertical menu of tabs. 2.
AUTOMOTIVEEditing and Managing WaypointsWhen you have created and stored a waypoint, you can modify, review, rename, move, or delete it at any time th
AUTOMOTIVETo change the waypoint name:1. Open the Waypoint Review or Waypoint Edit Page.2. Highlight the Name field, and press ENTER.3. Use the ROCK
AUTOMOTIVEAdding a Waypoint to a RouteAppend to Route adds the selected waypoint to the end of a route. This option appears when you are not navigatin
AUTOMOTIVEProjecting a WaypointYou can also create a new waypoint by “projecting” the distance and bearing from a specific location to a new location.
GETTING STARTEDUnit OverviewThe GPSMAP 496 is an all-in-one, versatile color aviation, automotive, and marine navigator-perfect for air, land, or wate
AUTOMOTIVEOrganizing Waypoints into CategoriesYou can organize your waypoints into categories, which can help when managing and using your waypoints.
AUTOMOTIVETo assign a category to a waypoint:1. Open the Waypoint Page. (You can also change the category on the New Waypoint Page.)2. Select the Ca
AUTOMOTIVEThe total number of stored and available waypoint information is available at the bottom of the User sub tab, with the stored waypoints arra
AUTOMOTIVETo delete waypoints by symbol or category:1. From the User sub tab, highlight the waypoint you want to delete, and press MENU.2. Highlight
AUTOMOTIVETo turn proximity alarms on or off:1. Press MENU twice to open the Main Menu. 2. Highlight Points from the vertical list of tabs. Highligh
AUTOMOTIVEManaging Your TracksThe GPSMAP 496 draws an electronic breadcrumb trail or “track log” on the Map Page as you travel. The track log contains
AUTOMOTIVETo clear the track log:1. Press MENU twice to show the Main Menu.2. Highlight Track, then highlight the Active sub tab to the right.3. Se
AUTOMOTIVESaved Sub TabThe Saved sub tab lists all of the saved tracks in your unit. Saved Sub TabPress MENU to open the Saved sub tab options menu:Re
AUTOMOTIVENavigating a Saved TrackThe TracBack function allows you to retrace your path using the track log automatically stored in the receiver’s mem
MARINEBASIC OPERATION IN MARINE MODETo switch usage modes:1. Press and hold the PAGE/MODE button. 2. Use the ROCKER to select either Aviation, Autom
Produits connexes et manuels pour Navigateurs Garmin GPSMAP 496
 (174 pages)
© 2020, manymanuals.fr. Tous droits réservés | 1.142 s |
 Manymanuals.com
 Manymanuals.de
 Manymanuals.fr
 Manymanuals.it
 Manymanuals.pl
 Manymanuals.cz
 Manymanuals.es
 Manymanuals-pt.com
Commentaires sur ces manuels